
Please enter a keyword
Generate landing pages
AI builds landing pages from product and brand details. Follow illustrated steps for input, outlines, AI and block edits, forms, split tests, and publishing.
Author: Cascade
LP Generation uses AI to create a landing page from your product or service information and brand settings. It generates all the copy and images. After generation, refine the page with AI instructions or edit individual blocks. You can publish to a Cascade default URL, your own domain, or your server (FTP). Published landing pages automatically connect to ad-to-LP match checks and lead tracking. You can also add forms and split test 2–3 versions.
Open Creative > LP Generation in the left menu.

LP Generation home screen
What you can do
Capability | Description |
|---|---|
Set up a brand profile | Save colors, fonts, a logo, and a favicon to reuse each time you generate a page (optional) |
Generate a landing page | Enter settings and content in 2 steps, and AI creates the entire landing page. You can also review a structure plan first |
Refine with AI and edit blocks | Give written instructions or edit text, links, colors, and images by block. You can restore an earlier version from the version history |
Interactive blocks | Add forms, popups, gacha, sliders, YouTube, navigation, Google Maps, and sticky CTAs |
Subpages | Create subpages with the same design, such as a disclosure under the Act on Specified Commercial Transactions or a privacy policy |
Publishing | Publish to a Cascade default URL, your own custom domain, or via FTP transfer. You can also embed measurement tags |
Split test | Serve 2–3 versions of a published landing page and compare them while adjusting traffic ratios |
Ad-to-LP match check | Diagnose landing pages used as ad destinations once a week and receive improvement proposals |
Before you begin
LP Generation is a Business plan feature.
Owners, Admins, and Editors can generate, edit, and publish pages. Viewers and Guests cannot open the page.
Generating 1 landing page uses 8 credits. If you review the structure plan first, the plan uses 1 credit and full generation uses 7, for the same total.
Each AI refinement uses 1 credit. Generating images in the editor uses 1 credit per image, and re-diagnosing ad match uses 1 credit per check.
If generation fails, the credits used for that attempt are refunded.
You can upload PNG/JPEG/WebP/GIF images. Logos, photo assets, and images in the editor can be up to 5MB. Cross-sell product images can be up to 2MB.
To accept submissions through a form block, you must publish the page with the Cascade measurement tag embedded.
Steps
1. Set up a brand profile (optional)
When you set up a brand profile, its colors, fonts, logo, and favicon are applied to your landing page. Colors include primary, secondary, and accent colors. Fonts cover headings and body text. You can create multiple profiles and use a different one for each product. You can also generate a landing page without a profile. In that case, colors and fonts are selected automatically based on the URL you enter or the reference design.
Click Manage brand at the top right of the home screen.

Brand profile list
Click Create brand profile in the list.

Brand profile creation screen (basic information, logo, and favicon)
Field | Description |
|---|---|
Profile name | The name used when selecting the profile in the list or on the generation screen |
Industry and tone | Defaults for the design direction. Values selected in Settings on the generation screen take priority |
Logo image | The logo used in the header and footer (PNG/JPEG/WebP/GIF, up to 5MB) |
Favicon | The icon shown in browser tabs (PNG/ICO, up to 512KB. A square image of at least 32×32px is recommended) |
Heading font and body font | Select from the dropdown menus. Check the preview to see how they look |

Brand color settings screen
Enter primary, secondary, and accent colors using the color picker or HEX format (#RRGGBB). Turn on Set as default to preselect this profile on the generation screen. When you finish, click Save.

List of created brand profiles
Each profile appears as a card in the list. Use the pencil icon to edit it or the trash icon to delete it.
2. Select settings
Click Generate LP on the home screen to open the 2-step input screen. The first step is Settings.

Generation settings screen
Field | Options |
|---|---|
Industry | SaaS / E-commerce / Services / Food and Beverage / Real Estate / Education / Beauty / Events / Recruiting / Other |
Goal | Lead Generation / Purchase / Free trial / Request Information / Webinar registration / App Download |
Tone | Trustworthy / Urgent / Friendly / Modern / Luxurious |
Language | Japanese, English, Chinese (Simplified/Traditional), Korean, Spanish, French, German, Portuguese, Indonesian, Thai, Vietnamese |
Device | Desktop First / Mobile First / Responsive |
Image style | Automatic (detected from the reference site) / Photographic / Illustration / Do Not Use AI Image Generation (Real Assets Only) |
The Industry and Goal determine the landing page type, such as an e-commerce product page or a lead generation page. The tone guides the colors and wording. When you finish selecting, click Next.
3. Enter content

Top of the content input screen (URL, reference design, and Describe the LP you want)
Reference service or product URL and Fill from URL
Enter the URL of the official page for the product or service you want to sell. Click Fill from URL to have AI read the page. It drafts the company name, product name, description, features, photo assets, and brand colors and fonts. You can edit the extracted content directly in each field.
Reference design
Select a design to use as the basis for your landing page's appearance. Text and photos are not copied as-is.
Reference the design of the service site you entered: Uses the colors, shapes, and textures of the page at the URL. Select This site is operated by my company to automatically include it as a reference option for future generation.
Enter another reference URL: You can also specify another company's site. Enter the URL and click Use as reference.
No reference (generate freely): Generates the page using only your input and brand profile.
Describe the LP you want (optional)
Describe the direction, target audience, and feel in your own words, such as "Minimal and elegant, for women in their 30s–40s." What you write here takes the highest priority.

Fields for company name, product name, product description, and brand profile
Currency, company name, product name, tagline, and product description
Field | Required/optional | Description |
|---|---|---|
Currency | Optional | The currency used to display pricing and cross-sell product prices |
Company name | Optional | Used in the footer and company introduction |
Product or service name | Required | Also becomes the landing page title |
Tagline | Optional | A short phrase that can serve as the hero heading |
Product description | Required | The information AI uses to write each section. Include more facts, such as features, results, prices, and conditions, for greater accuracy |
Brand profile
Select one of your saved profiles. You can also generate a page without selecting one. Colors, fonts, and spacing read by Fill from URL appear as the Extracted design system and are used for generation.

Feature fields
Features and CTA
For each feature, enter a title and description of a product strength or differentiator. Click Add to include more. Enter CTA text (e.g. Try it for 500 yen, first-time customers only) and a CTA URL (the signup page). These are used for buttons in the hero and pricing sections.

Fields for CTA, store map, and testimonials
Store or company map (optional)
Enter a Google Maps embed URL to include a map section on the landing page.
Testimonials and FAQ (optional)
Enter names, titles, and comments to populate the Testimonials section. Enter questions and answers to populate the FAQ section. Your input is published as written. AI does not add facts.

Image asset and cross-sell product fields
Image assets (optional)
Logo: Used in the header and footer. If the brand profile has a logo, that logo is used.
Photo assets (up to 24): Click Add photo asset to add photos. You can upload them or choose from saved images or the asset library. Added photos appear as-is on the landing page alongside AI-generated images. The first image takes priority as the main image (Hero candidate). Use the arrows to reorder images. Add a description of "what is in the image" to place it in a relevant section.
If you have no photo assets, AI generates all images.
Cross-sell products (optional)
Add related products to display in the You may also like section at the bottom of the landing page. Enter each product's name, price, product page URL, and image. Images can be up to 2MB.

Generate button and Review the structure before generating
Start generation
Select Review the structure before generating to create only the structure plan first (1 credit). After you review and approve it, proceed to full generation (7 credits).
Click Generate LP without selecting the checkbox to generate everything at once, without reviewing the structure plan (8 credits).
If you do not have enough credits, the message "Insufficient credits" appears and you cannot start. Purchase credits from Settings > Billing / Plan.
4. Review the structure plan (when structure review is enabled)
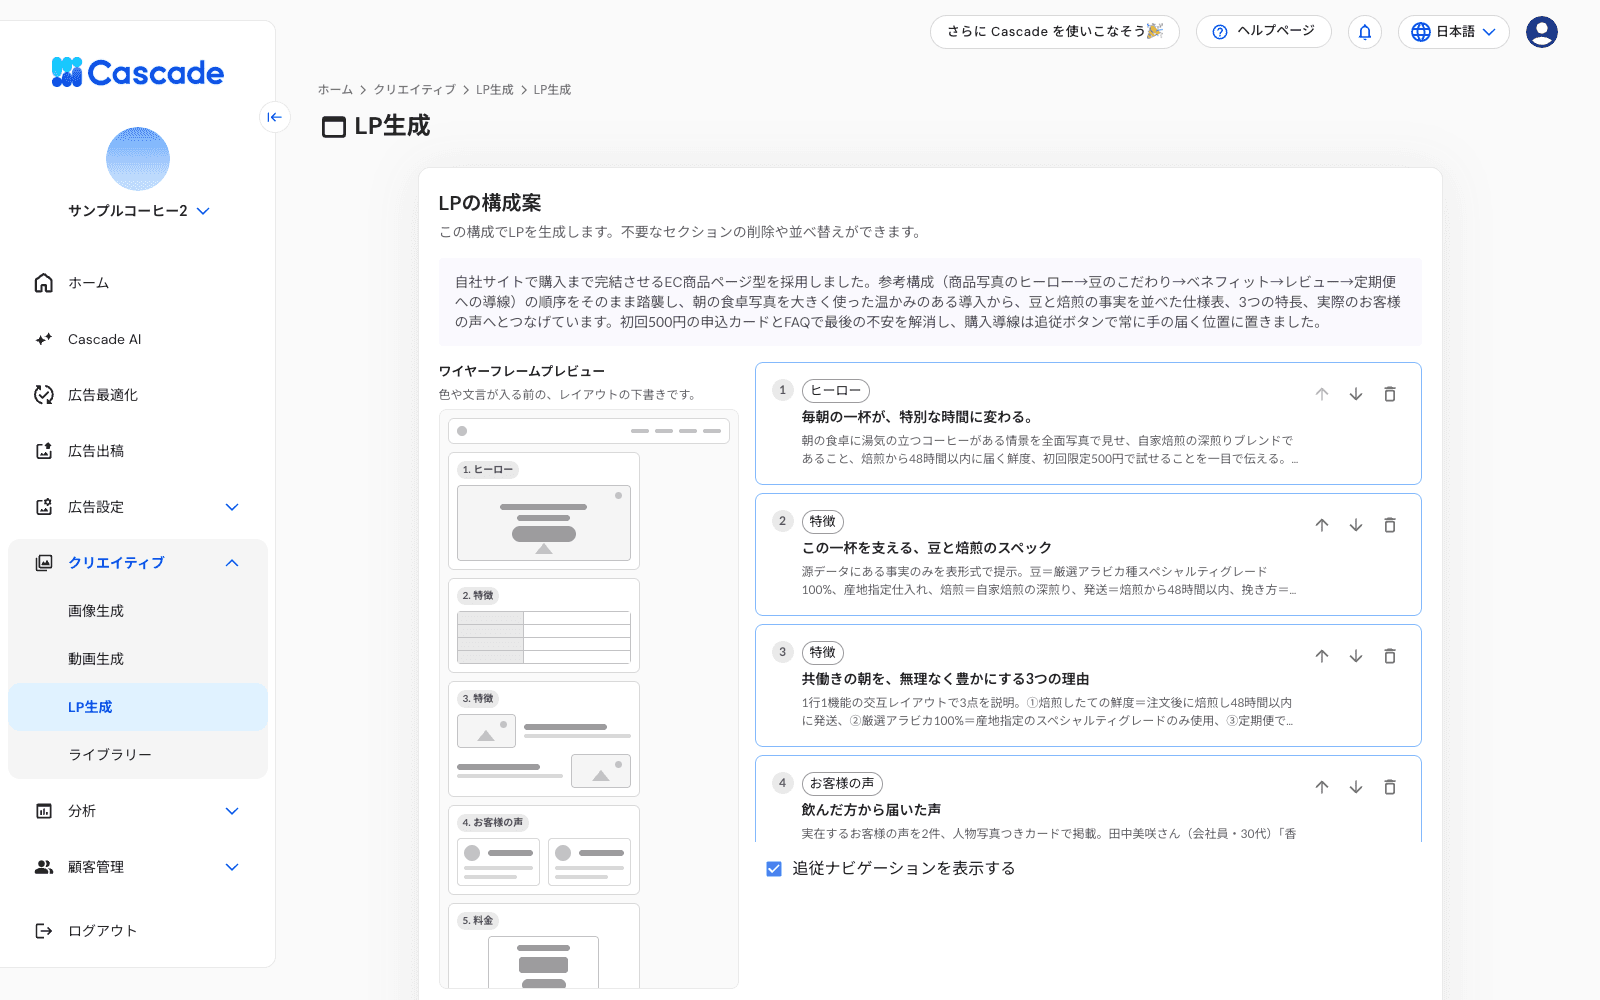
Landing page structure plan screen
The structure plan appears in about 1–2 minutes. Creation continues even if you navigate to another page. The landing page type selected by AI and its reasoning appear at the top, followed by a proposed heading and content summary for each section.
Use the arrows to reorder sections and the trash icon to delete them. You cannot delete sections if doing so would put the total below the minimum. You can have up to 16 sections.
The wireframe on the left shows the layout before colors and wording are added. It also shows whether there is a CTA bar fixed to the bottom of the screen or a CTA rail fixed to the edge.
Use Show the sticky navigation to choose whether the navigation bar stays visible as visitors scroll.
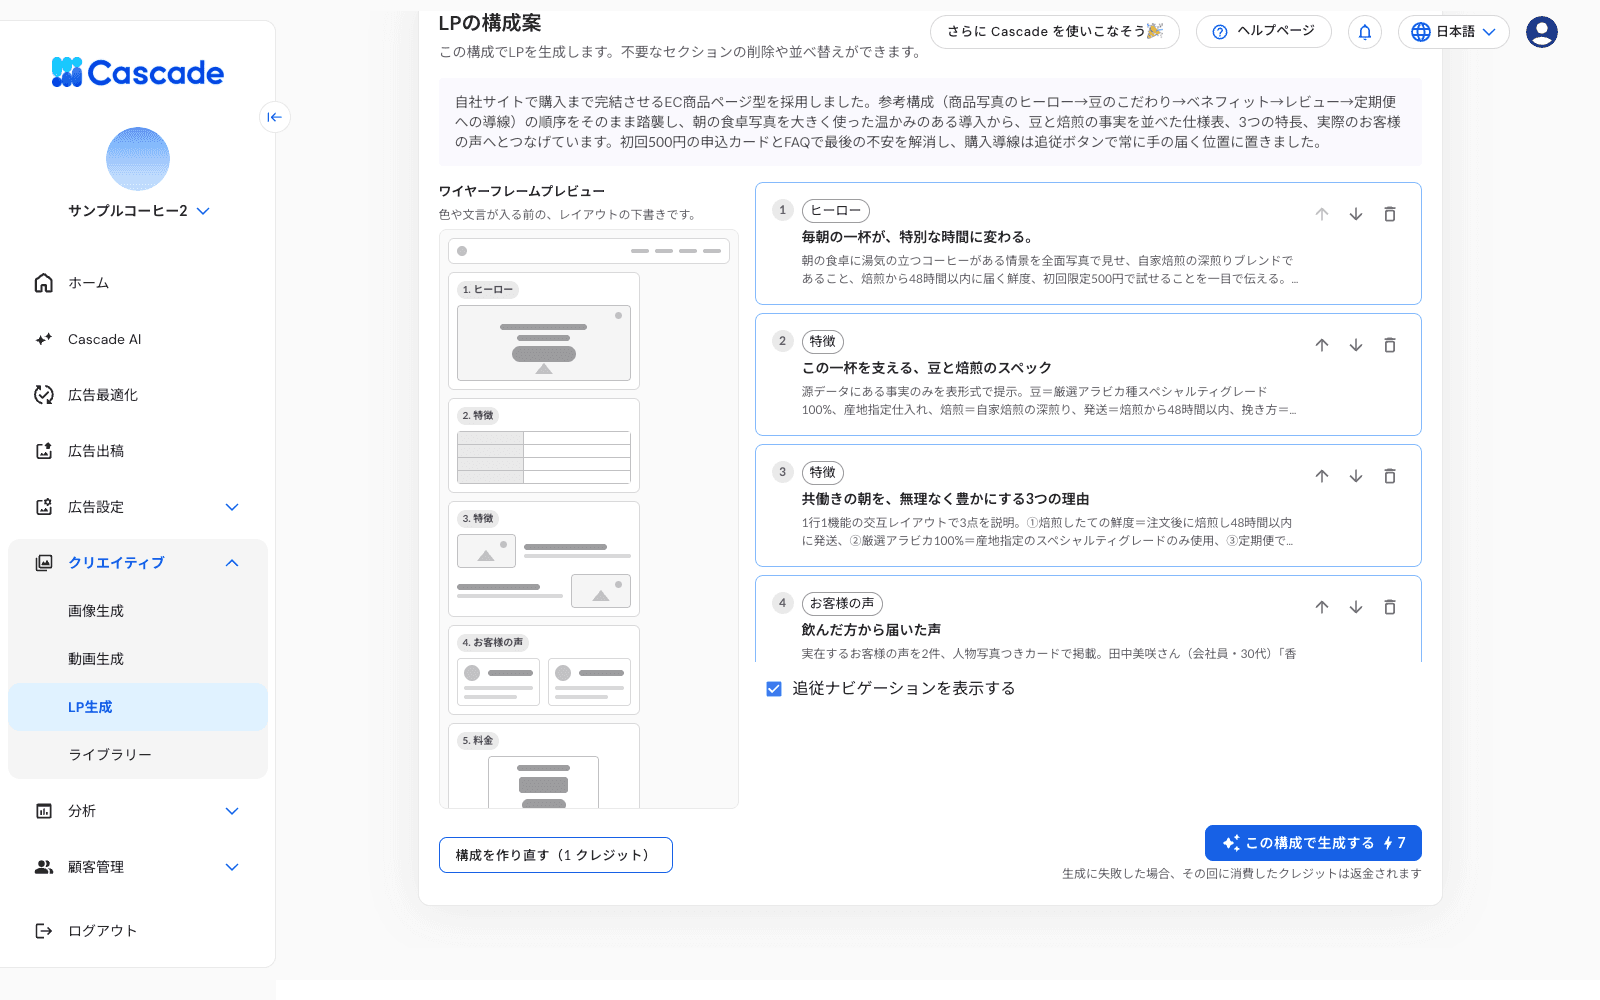
Wireframe preview
When you are satisfied, click Generate with this structure. To change the overall direction, click Redraft structure (1 credit) to regenerate only the structure plan. Landing pages awaiting review remain in the list with the status Awaiting plan review. Even if you close the screen, you can resume later with Review plan.
5. Wait for generation
Full generation usually takes 5–10 minutes. The screen shows elapsed time, an estimate, and the current stage. The stages are Creating the structure plan, Analyzing the reference design, Generating sections, Assembling the page, Running quality inspection, Repairing detected issues, Generating images, and Finishing up. Generation continues even if you navigate to another page or close your browser. The editor opens automatically when generation finishes. If generation takes more than 30 minutes, it is treated as a failure and the credits are refunded.
6. Refine with AI
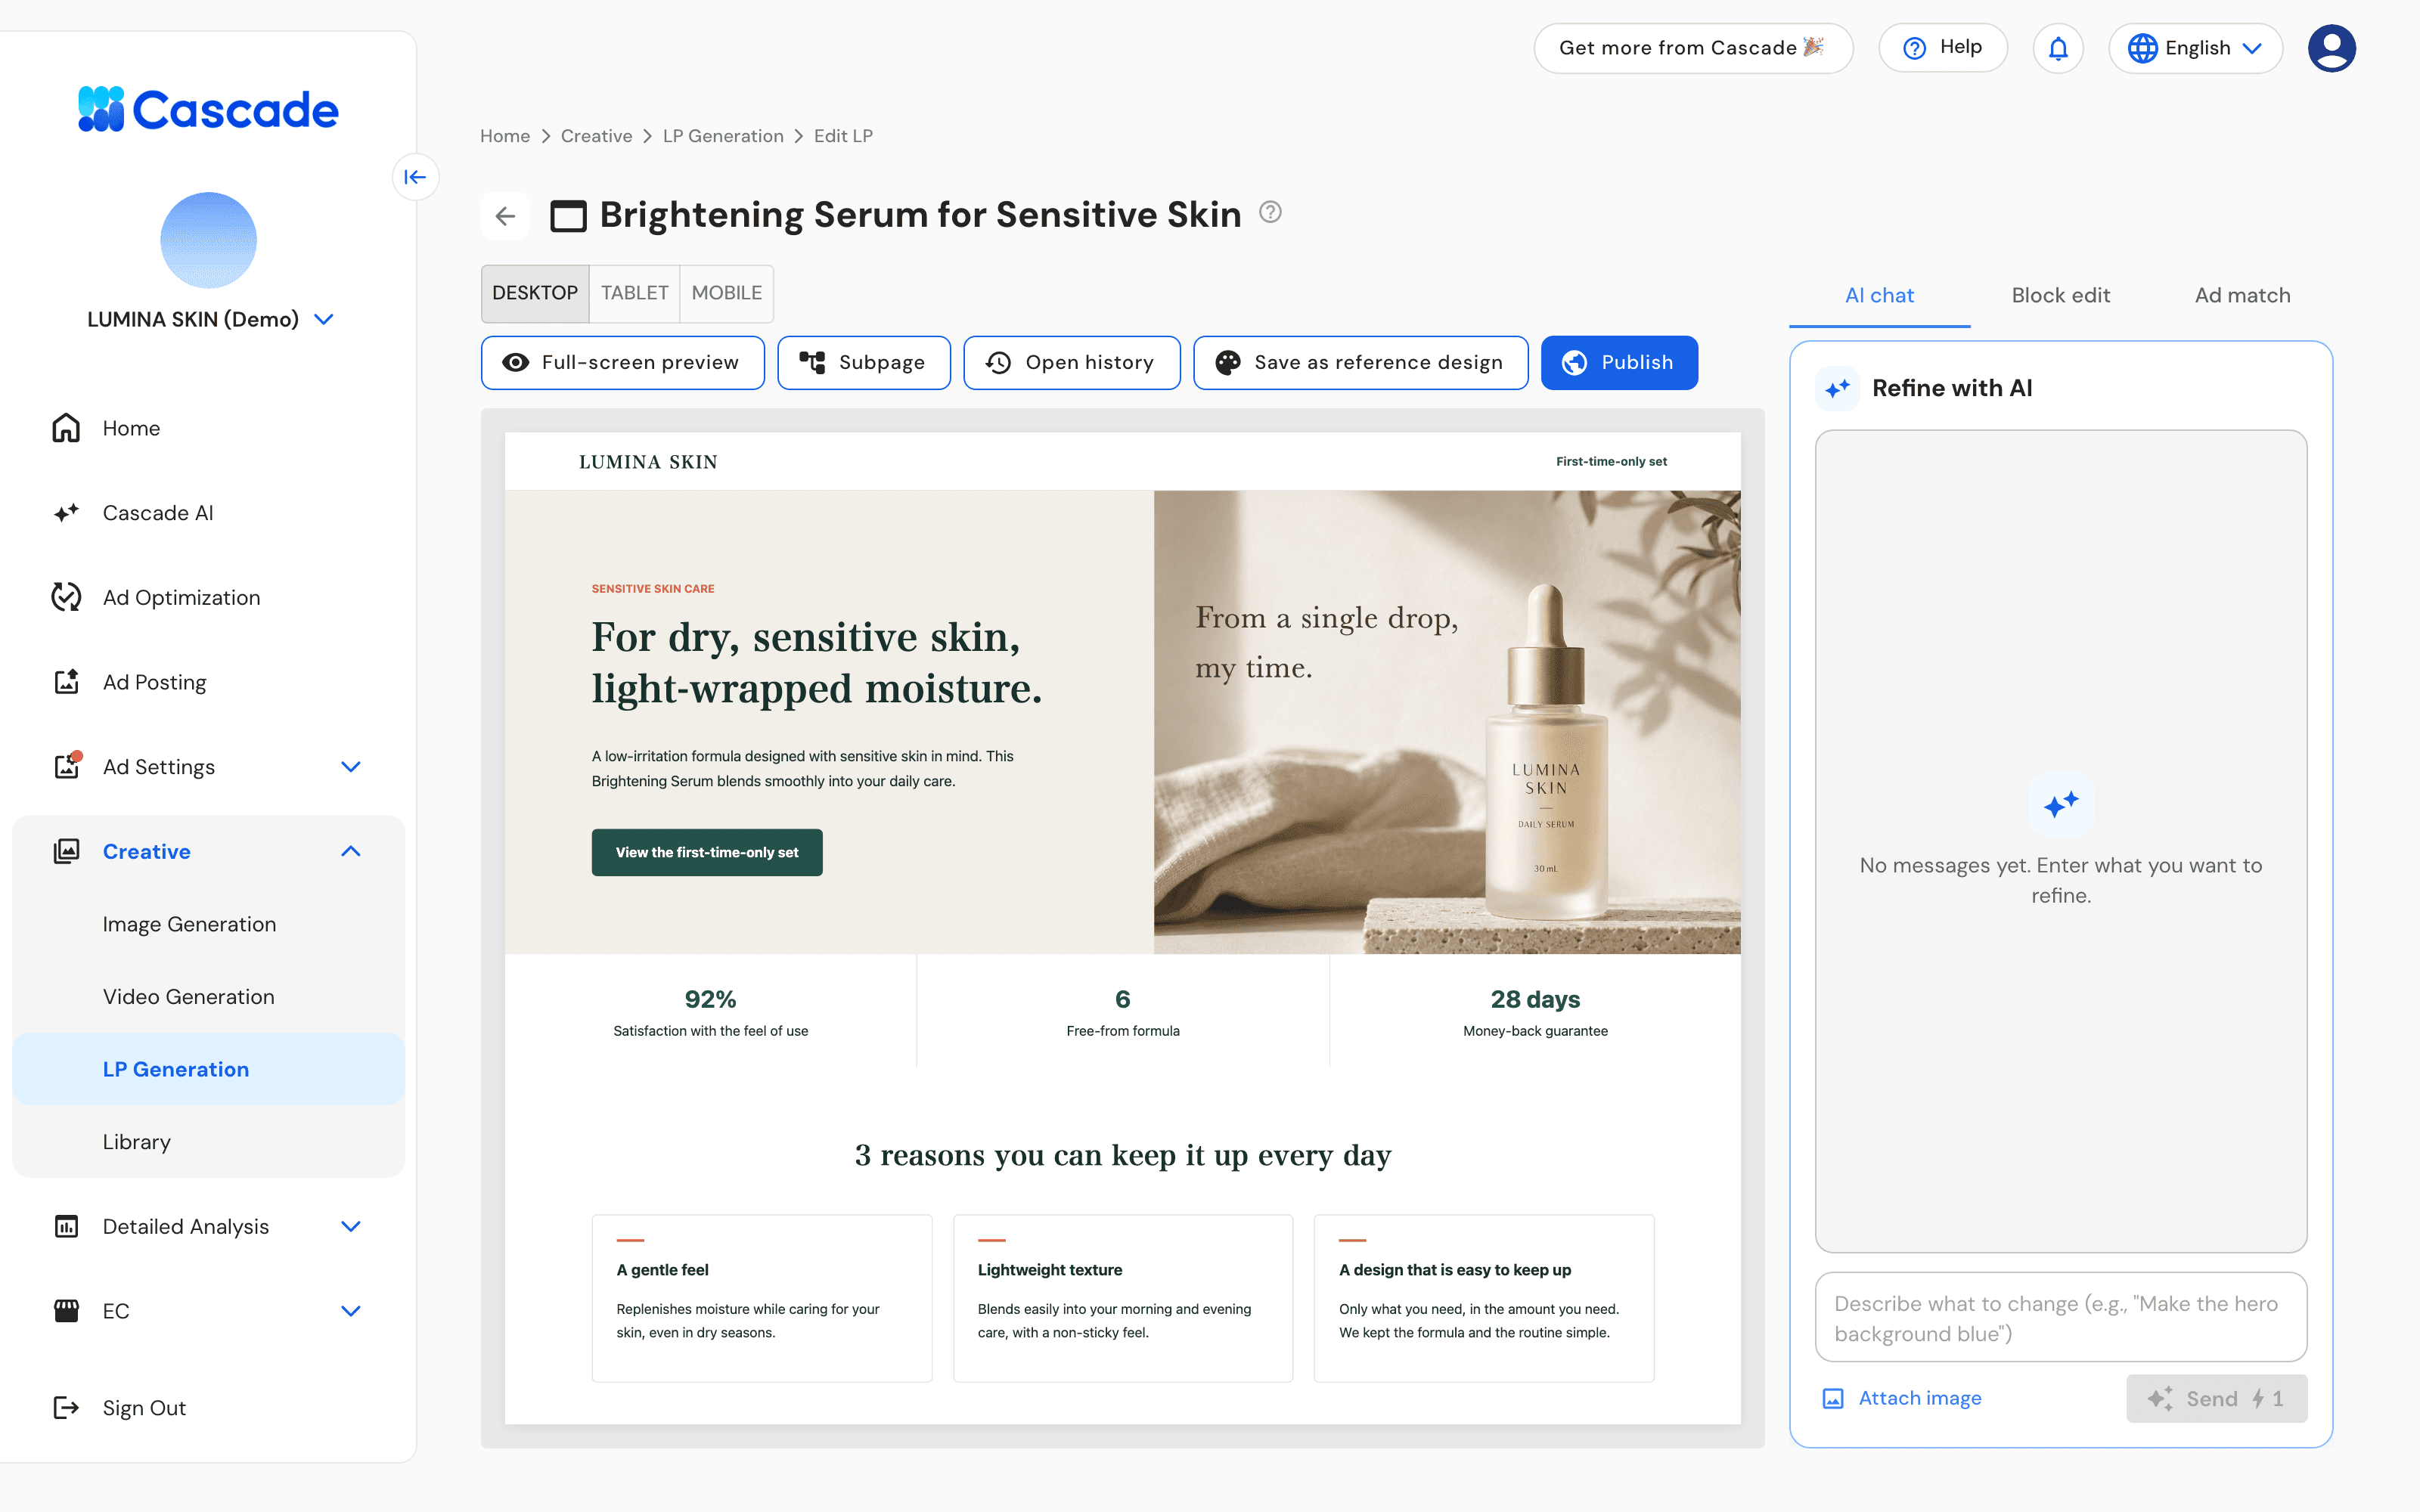
Landing page editor (AI chat tab)
The editor has a preview on the left and an editing panel on the right. Use the buttons at the top for the following actions.
Action | Description |
|---|---|
Desktop / Tablet / Mobile | Switch the preview width. Line breaks, font sizes, and image widths set in the block editor apply only to the selected device |
Full-screen preview | Display the landing page in a larger view for a final check before publishing |
Subpage | Generate subpages with the same design (step 9) |
Open history | Open the version history (step 9) |
Save as reference design | Make this landing page's design available as a reference for future generation. For older generated landing pages, regenerate them with the latest generation process before saving |
Publish | Open the publish dialog (step 10). After publishing, Open published URL, Custom domain, Split test, and Unpublish appear |
The right panel has 3 tabs: AI chat, Block edit, and Ad match.
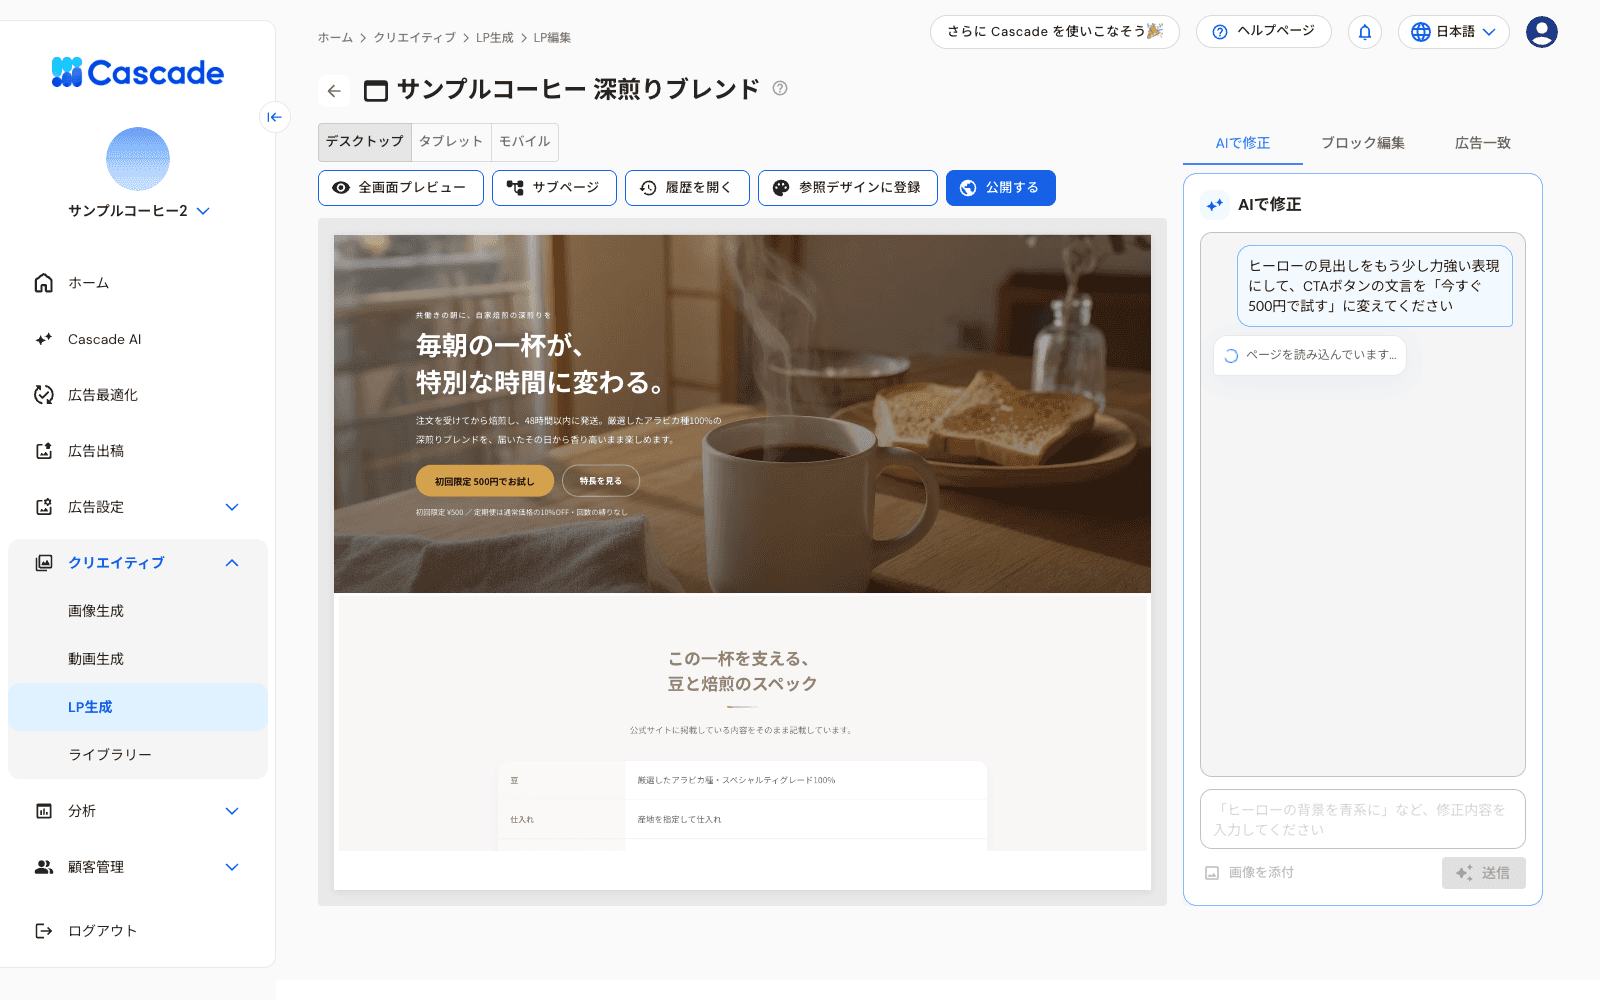
AI refinement in progress
Enter what you want to change and click Send. For example: "Make the hero heading stronger" or "Remove the pricing section." Each refinement uses 1 credit. Progress appears in sequence as AI plans the changes, rewrites the page, and saves it.
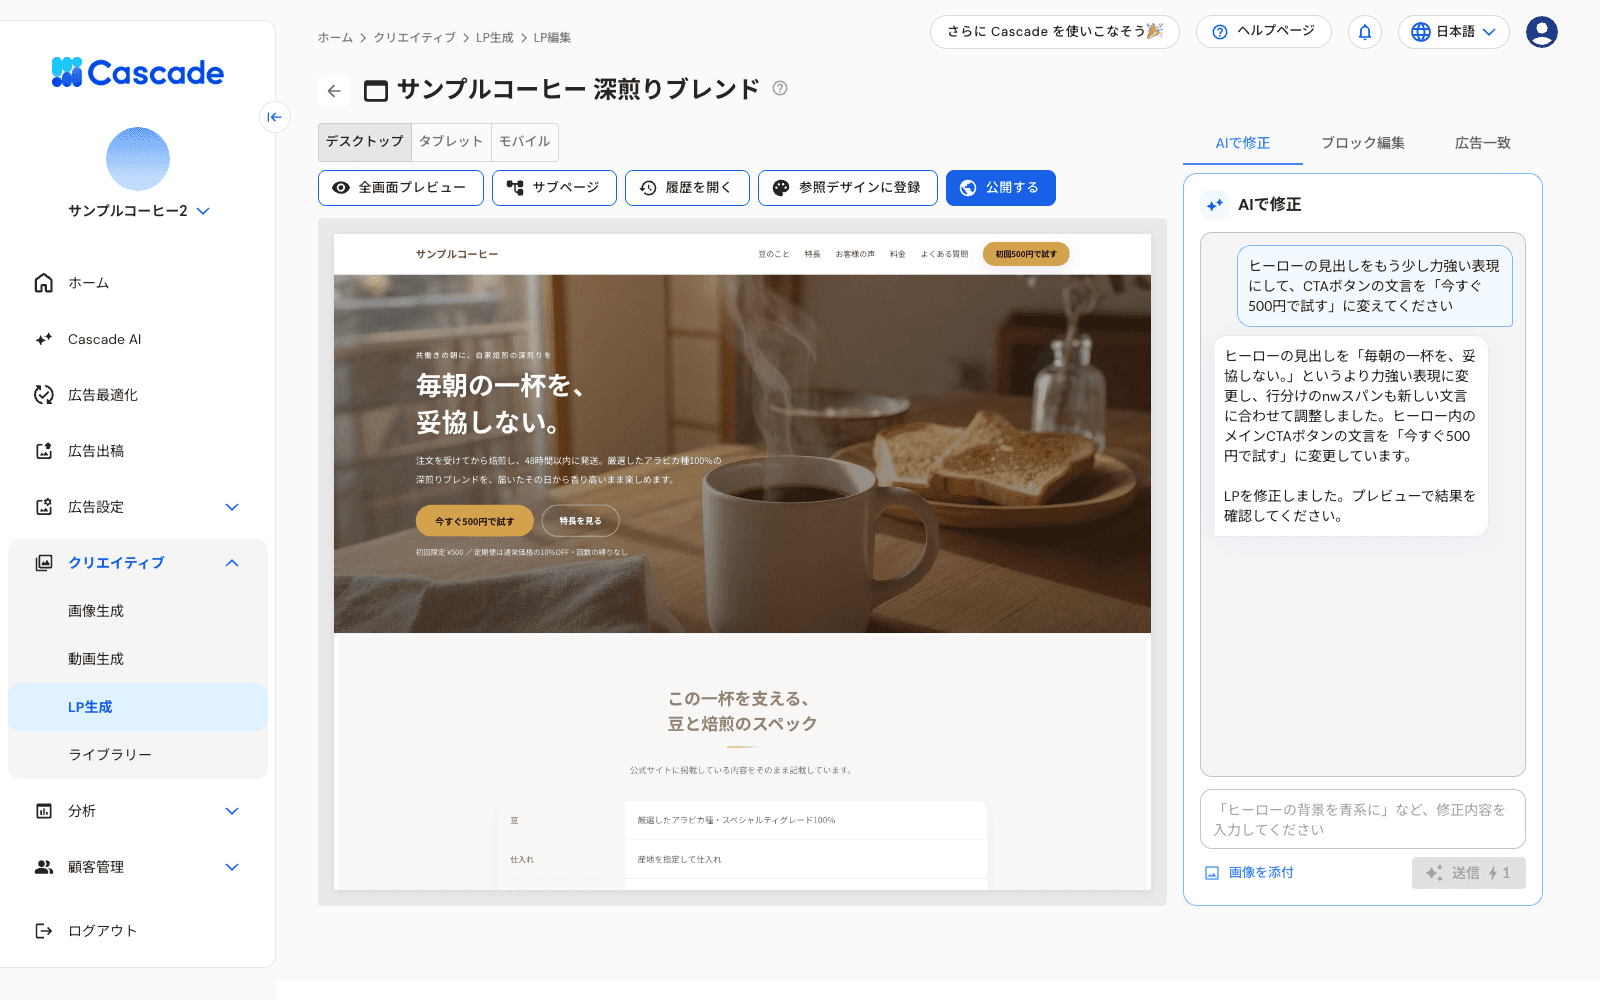
After AI refinement finishes
When refinement finishes, AI explains what changed and how, and the preview updates. A version is recorded with each refinement. If you do not like the result, restore an earlier version from the history. Use Attach image to attach up to 4 saved images or images from the library. Instruct AI to "Use this image in the hero" to embed it in the page, or "Match this look and feel" to use it as a reference.
7. Edit blocks directly

Block edit tab
The Block edit tab lists the landing page's blocks from top to bottom. Examples include the hero, features, testimonials, pricing, FAQ, CTA, and footer.
Drag a block's handle to reorder it, or use the trash icon to delete it.
Click Add a block and select a type. AI generates and inserts the content.
You can also select a block by clicking it in the preview.

Block type selection screen
You can add 2 types of blocks: standard sections (Hero / Features / Benefits / Testimonials / Case Studies / Pricing / FAQ / CTA / Gallery / About / Contact / Footer / Other) and interactive blocks (gacha, navigation, popups, YouTube, sliders, forms, Google Maps, and sticky CTAs). Some interactive blocks are limited to 1 per page.
When you select a block, editing tabs appear below. Standard sections have 4 tabs: Text, Links, Color, and Image. Interactive blocks also have a settings tab for that block.

Text tab
Text: Rewrite headings, body text, and other text one line at a time. For each line, you can change the heading tag (H1–H6/body text), text color, and font size, or duplicate, move up or down, or delete it. Line breaks and font sizes apply only to the device selected in the preview.

Links tab
Links: Edit the display text, destination URL, text color, and background color of buttons and text links. You can also delete links.

Color tab
Color: Change the block's background and text colors using the color picker or HEX format.

Image tab
Image: Replace images in the block. Click Change image to choose from the following options.
Saved images or images from the library
New upload (PNG/JPEG/WebP/GIF, up to 5MB)
Generate with AI (1 credit per image)
Import from image URL (up to 10MB and 50 million pixels, up to 10 times per minute)
You can also edit alt text, delete images, add text below an image, and set image widths for each device. If you use an image directly from another site's URL, it may disappear when that site changes. Click Import into Cascade to save it in Cascade.
When you finish editing, click Save changes. Saving records a version. To undo unsaved edits, click Discard edits.
8. Configure interactive blocks
After adding an interactive block, select it and change its content on the settings tab.
Forms

Form block settings
Add 1–30 fields. Choose from Name / Phonetic Name / Email / Phone Number / Postal Code / Prefecture / Address / Single-Line Text / Multi-line text / Consent / Radio Buttons / Dropdown / Fixed Value. Each contact field type is limited to 1.
You can split the name into last and first names. You can limit the prefectures you accept.
For the confirmation page after submission, select a published page from the same landing page or enter an https URL on an allowed domain.
You can also get embed code for external pages to place the form on a page outside Cascade.
Only pages published with Embed the Cascade measurement tag enabled accept submissions. If you publish with it disabled, the submit button is removed. For FTP transfers, also enter the public URL. You cannot submit forms in the editor preview.
Download responses from Download answers in the landing page's row in the list. Set submission notification destinations in Settings > Integrations (Owners and Admins).
Popups and exit-intent banners
The settings appear in this order: When to show, Popup content, Link button (optional), and Colors (optional).
Display trigger | Additional settings |
|---|---|
When a button on the page is clicked | Label of the button placed on the page |
Automatically after a few seconds | Seconds before showing (1–120 seconds) |
Automatically when the page is scrolled | Scroll position that triggers display (10–90%) |
When the visitor is about to leave (exit intent) | None |
Exit-intent content appears only once per session. On desktop, it appears when the cursor moves past the top edge of the screen. On phones and tablets, it appears the first time the visitor uses Back after interacting with the page. In-app browsers such as Instagram, Facebook, and LINE do not trigger Back. In those browsers, it appears when the visitor scrolls down by 1 screen, then scrolls up by at least half a screen within 1 second. It does not work in the editor preview, so check it on the published page.
Choose Card (heading, body, buttons) or Image only (the whole image is the link) as the display format. For the image-only format, include text and buttons in the image. A preview appears on the settings screen. Click Choose image to select a saved image or an image from the library, or upload one directly. Under Link button (optional), specify the text and destination URL. A destination URL is required if you enter text. You can also place a button that only closes the popup to the left of the main button.
Other blocks
Gacha: Choose a built-in animation (capsule/roulette) or a video, then set 1–8 prizes and a win weight (0–100).
Navigation: Add 1–8 links and keep them visible while scrolling.
YouTube: Enter a video ID to embed it.
Slider: Add 1–20 images and set the transition interval.
Google Maps: Set the embed URL and height (200–1200).
Sticky CTA: Set the blocks where it starts appearing and becomes hidden, how it appears, and its colors.
9. Version history and subpages

Version history
Click Open history to see versions recorded each time you generate a page, refine it with AI, or save block edits. Select a version to display it in the preview. Click Restore this version to create a new draft with that content. Saved drafts remain in the version history. Unsaved block edits are discarded.

Subpage creation screen
Click Subpage to generate a subpage using this landing page's design. Enter a page title and generation instructions, then click Generate. For example: "Create a privacy policy page. Include personal information handling, cookie use, and contact details." You can open or delete existing subpages from the same dialog. You cannot create subpages while edits are unsaved or while viewing an earlier version.
10. Publish the landing page

Publish dialog (Cascade default URL)
Click Publish in the editor and select a publishing destination. Unsaved block edits are not published. Click Save changes first.
Publish at Cascade default URL
Specify a slug using lowercase English letters, numbers, and hyphens to publish at pages.cascade-lp.com/slug. This is the easiest way to get started right away.

Publish dialog (your custom domain)
Publish on your custom domain
Publish on a subdomain of a domain you own (e.g. lp.your-company.com). After publishing, add the displayed CNAME/TXT records to your DNS. An SSL certificate is issued within a few minutes to a few hours. Visitors see only your domain.

Publish dialog (FTP transfer)
Publish via FTP transfer (your server)
Publish directly to your server via FTP/FTPS. Enter the protocol (FTPS recommended), hostname, port, username, and password. Also enter the upload directory and an optional public URL. No DNS changes are needed, and the page is not hosted at a Cascade default URL. If a file with the same name exists at the destination, the transfer stops. Click Overwrite and publish to continue. The public URL is used for the link in the list and for Cascade measurement tag checks.
Analytics tags and the Cascade measurement tag
At the bottom of the publish dialog, configure the measurement tags to embed in the published landing page.
Field | Description |
|---|---|
GA4 Measurement ID | e.g. G-XXXXXXXXXX. If you publish on a subdomain, you can use the same ID as your main site |
Google Tag Manager ID | e.g. GTM-XXXXXXX. If you deploy GA4 or Meta Pixel through GTM, leave the other fields empty to prevent double tracking |
Meta Pixel ID | Use landing page visitors as a retargeting audience for Meta Ads |
Embed the Cascade measurement tag | When enabled, form submissions and purchases on the landing page are automatically linked to lead tracking and ad performance. The publishing domain is automatically added to the allowed domains. Turn this off if the tag is already deployed on the destination site or through GTM. However, for pages with a form block, keep it enabled when publishing even if the tag is already deployed |
You can select the Cascade measurement tag for any publishing destination. For FTP transfers, it is embedded only when you enter a public URL. The domain is added to the allowed domains once tag deployment is verified at that URL. If you leave the public URL empty, the page is published without the tag and a message appears. To apply setting changes to a published landing page, publish it again after updating the settings.
After publishing
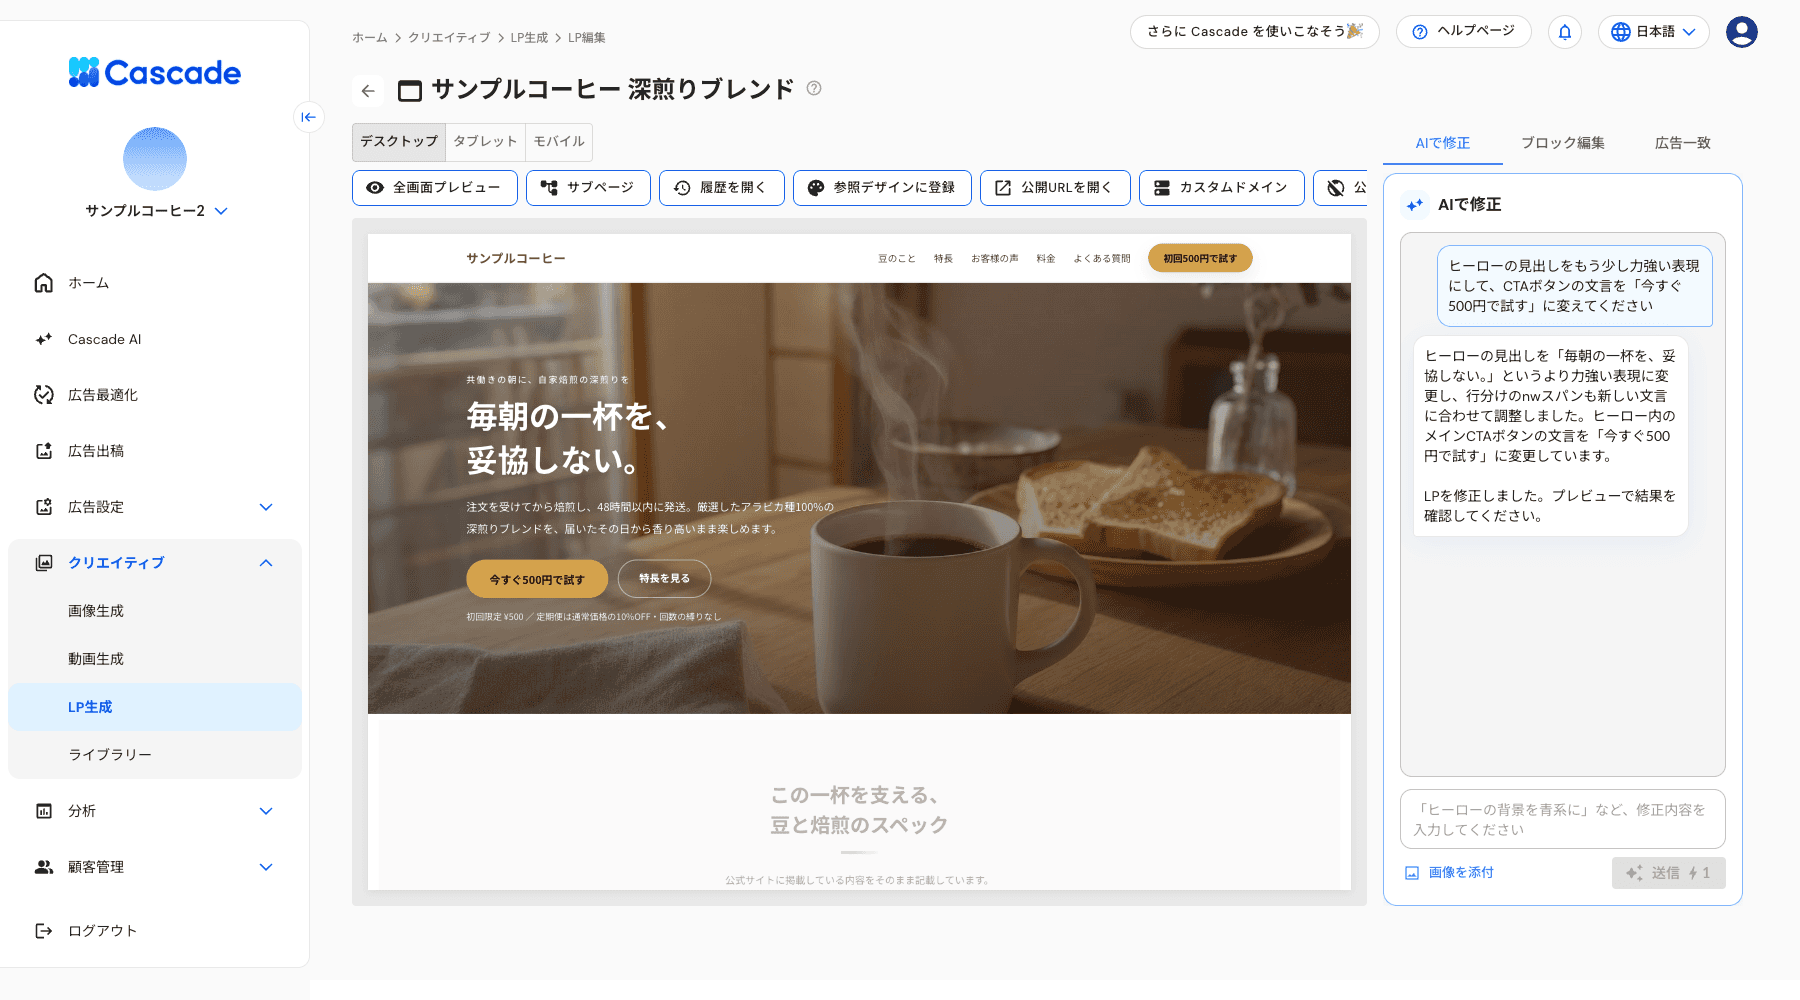
Editor after publishing
After publishing, the editor buttons change to Open published URL, Custom domain, Split test, and Unpublish. Edits made after publishing do not appear on the live page until you click Publish again.
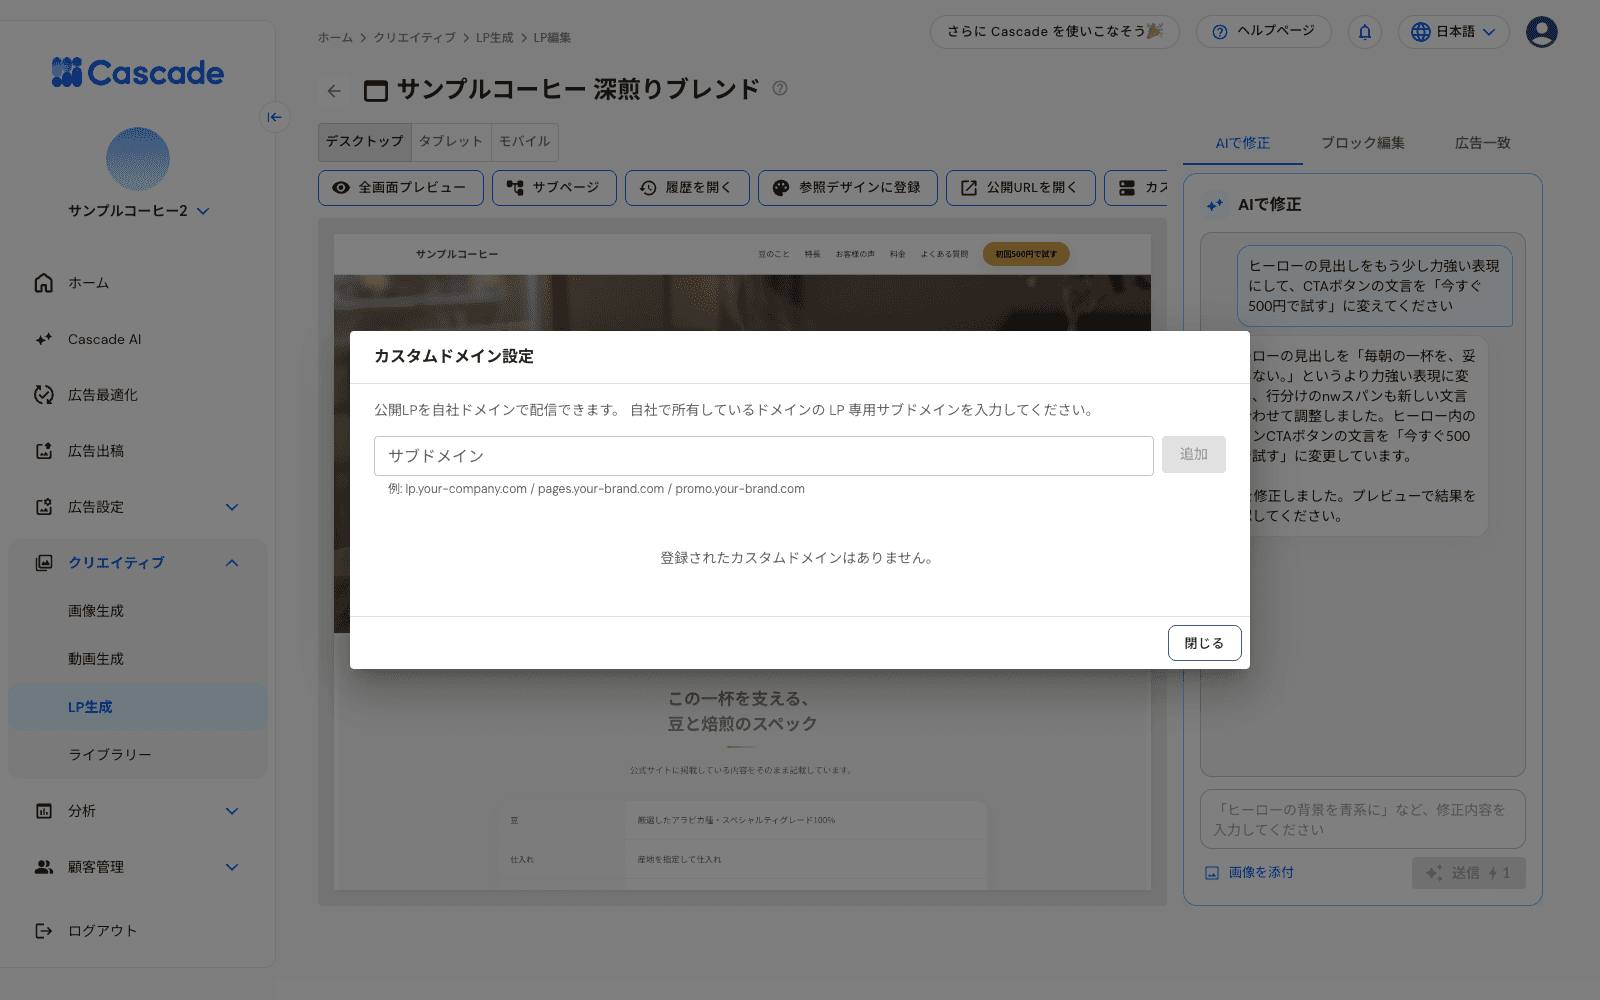
Custom domain settings
In Custom domain, you can add or remove subdomains. You can also check the statuses Pending domain validation, Pending SSL issuance, and Active. Click Refresh status to update them. Clicking Unpublish makes the public URL inaccessible. Unpublishing also removes custom domain registrations, so register them again after republishing.
11. Split test 2–3 versions
Serve multiple versions of a published landing page and compare their performance. Click Split test in the editor.
You can start only with landing pages published with the Cascade measurement tag embedded. Only unpublished draft pages of the same landing page can be used as versions.
Compare 2–3 versions. Set a label and traffic ratio (%) for each, totaling 100%. All versions use the published page's measurement tag, GA4, GTM, and Meta Pixel settings.
After starting, you can use Change weights, Add a version, Measurement settings, and Update version from draft. Ratio changes apply only to new visitors. Visitors already assigned to a version keep that version. Adding a version starts a new comparison and reassigns visitors.
You can Stop each version individually. Use Revert to one version to serve only the selected version. If changes have not been applied to the default URL or custom domain, click Apply again.
12. Check ad-to-LP match
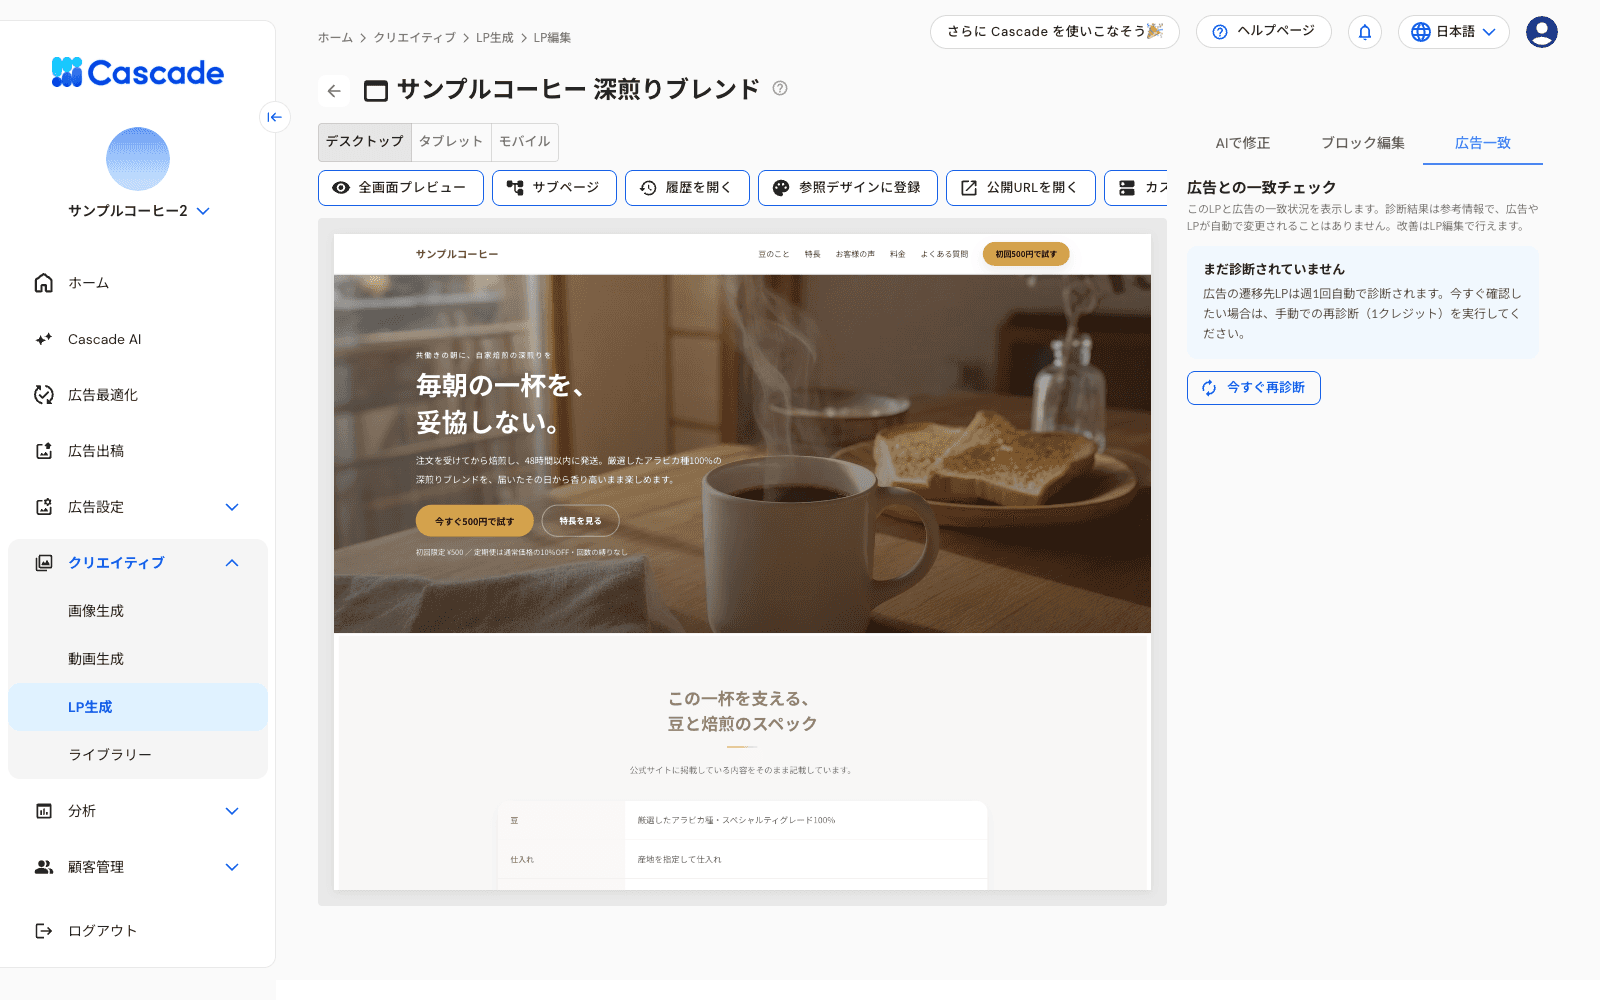
Ad match tab
When you set a published landing page as an ad destination, you can view diagnosis results on the Ad match tab. The health score breaks down into LP structure, Ad match, and Load speed. The tab also shows an ad-to-LP comparison, improvement proposals, and ads currently directing traffic to this landing page. Diagnosis runs automatically once a week. To check immediately, click Re-diagnose now (1 credit). Results are for reference. Ads and landing pages are not changed automatically. For details, see Use LP Analysis.
13. Manage landing pages in the list
Return to the LP Generation home screen to see your generated landing pages in a list. Publish pages from the editor.
Column | Description |
|---|---|
LP Name | Automatically assigned from the product or service name. Click the LP name to rename it |
Public URL | The live URL. Click to open it. If you did not enter a public URL for an FTP transfer, Public URL not set appears |
Status | Draft / Generating / Awaiting plan review / Generation Complete / Published / Unpublished |
Updated at and created by | The last update date and time, and the member who created the page |
Actions | Edit / Review plan (when awaiting plan review) / Download answers (when there are form responses) |

Confirmation for deleting multiple landing pages
Landing pages that fail to generate do not appear in the list. To delete pages, select the checkboxes on the far left and click Delete. Deletion cannot be undone. Unpublish live landing pages before deleting them. Deleting a landing page with subpages also deletes all its subpages.
Example of a finished landing page

Example of a generated landing page (full view)
This landing page was generated using only a product name, description, 3 features, 2 testimonials, and 2 FAQs. No photo assets were added, so all images were generated by AI.
Troubleshooting
Symptom | Cause | Solution |
|---|---|---|
"Insufficient credits" appears and generation cannot start | You have fewer credits than required | Purchase credits from Settings > Billing / Plan |
Generation fails | A temporary error occurs, or generation takes more than 30 minutes | The credits used for that attempt are refunded. Generate the page again |
"Could not read the design" appears and you cannot use the reference design | The URL is inaccessible, redirects to another site, or has no readable content | Check that the page is public, enter the destination URL directly, and click Retry |
You cannot click Save as reference design | The landing page was created with an older generation process | Create it again with the latest generation process, then save it as a reference |
Edits do not appear after publishing | Unsaved block edits are not published. Edits made after publishing require republishing | Click Save changes, then click Publish again |
"There are N images from external sites" appears when publishing | You are using images directly from other sites' URLs | Click Import into Cascade on the Image tab in the block editor, then publish |
"The allowed domain limit (20) has been reached" appears | The Cascade measurement tag has 20 allowed domains | Remove unneeded domains in Customer Management > Measurement Tag, then publish again |
"The measurement tag was not embedded because the public URL is empty" appears during an FTP transfer | The public URL is empty | Enter the public URL in the publish dialog and publish again |
The FTP transfer stops with "Transfer stopped because files already exist at the destination" | Files with the same names exist | If you want to overwrite them, click Overwrite and publish |
The form on the published landing page has no submit button | The page was published with Embed the Cascade measurement tag disabled, or the public URL was not entered for FTP | Enable it and publish again. For FTP, also enter the public URL |
You cannot start a split test | The page was published without the Cascade measurement tag, or there are no draft pages to use as versions | Unpublish the page, enable the measurement tag, and publish again. Prepare draft pages to use as versions |
The custom domain stays at Pending domain validation | The DNS records have not taken effect | Add the displayed CNAME/TXT records to your DNS, wait, and click Refresh status |
You cannot create a subpage | Edits are unsaved, or you are viewing an earlier version | Click Save changes or return to the latest version before creating a subpage |
You cannot find a landing page in the list | Landing pages that fail to generate are not displayed | Generate the page again |
Related articles
More articles in this category